月度归档: 2018年9月

使用docker构建jenkins

1.拉取docker hub上的jenkins镜像,并且运行

参考https://jenkins.io/doc/book/installing/ 文章,使用的镜像是jenkinsci/blueocean
输入命令

docker pull jenkinsci/blueocean

然后输入运行docker镜像命令,这里我选择8081端口,和jenkins数据路径/root/docker/jenkins_home

docker run 
  -u root 
  --rm 
  -d 
  -p 8081:8080 
  -p 50000:50000 
  -v jenkins-data:/root/docker/jenkins_home 
  -v $PWD/allure-results:/allure-results 
  -v /var/run/docker.sock:/var/run/docker.sock 
  jenkinsci/blueocean

2.打开网页的8081端口,登录jenkins首页


发现需要输入jenkins密码。因为jenkins是安装在docker里的,所以要进入docker容器里去寻找密码

3.进入容器里,获取管理员密码

输入docker ps 获取容器的ID,290cbfd4bfe4

[root@VM_0_12_centos docker]# docker ps -a
CONTAINER ID        IMAGE                 COMMAND                  CREATED             STATUS                           PORTS                                              NAMES
290cbfd4bfe4        jenkinsci/blueocean   "/sbin/tini -- /usr/…"   10 minutes ago      Up 10 minutes                    0.0.0.0:50000->50000/tcp, 0.0.0.0:8081->8080/tcp   sharp_fermat
de4a5ed40efd        friendlyhello         "python app.py"          47 hours ago        Exited (137) About an hour ago                                                      wizardly_kar

进入jenkins容器

docker exec -it 910d23b3bd10 /bin/bash

进入/var/jenkins_home/secrets/目录

cd /var/jenkins_home/secrets

查看initialAdminPassword

bash-4.4# cat initialAdminPassword
084b2fca0b434f189358123412312313113

把密码复制出来,用于登录jenkins

4.选择插件,安装jenkins,等待即可完成


完成之后,输入自己的系统管理员用户名密码就好啦~本次课程结束~

docker官网实例,用Dockerfile构建你的第一个python应用

#备注:默认读者已经安装好了docker环境

第一步:创建一个应用目录(后面使用该目录为工作目录,存放应用文件以及Dockerfile):

mkdir /root/docker/lzwtestpython
cd /root/docker/lzwtestpython

第二步:为容器定义一个Dockerfile:

创建Dockerfile文件:

vi Dockerfile

输入Dockerfile文件内容:

# Use an official Python runtime as a parent image
FROM python:2.7-slim
# Set the working directory to /app
WORKDIR /app
# Copy the current directory contents into the container at /app
COPY . /app
# Install any needed packages specified in requirements.txt
RUN pip install --trusted-host pypi.python.org -r requirements.txt
# Make port 80 available to the world outside this container
EXPOSE 80
# Define environment variable
ENV NAME World
# Run app.py when the container launches
CMD ["python", "app.py"]

在文件内容中,我们可以看到,我们的python文件为app.py,下面我们需要去创建这个文件。一般来说,python项目中会包含一个 requirements.txt 文件,用于记录所有依赖包。

第三步:创建requirements.txt和app.py

创建requirements.txt文件:

vi requirements.txt

输入requirements.txt文件内容:

Flask
Redis
创建app.py文件:
vi app.py

输入app.py文件内容:

from flask import Flask
from redis import Redis, RedisError
import os
import socket
# Connect to Redis
redis = Redis(host="redis", db=0, socket_connect_timeout=2, socket_timeout=2)
app = Flask(__name__)
@app.route("/")
def hello():
    try:
        visits = redis.incr("counter")
    except RedisError:
        visits = "<i>cannot connect to Redis, counter disabled</i>"
    html = "<h3>Hello {name}!</h3>" 
           "<b>Hostname:</b> {hostname}<br/>" 
           "<b>Visits:</b> {visits}"
    return html.format(name=os.getenv("NAME", "world"), hostname=socket.gethostname(), visits=visits)
if __name__ == "__main__":
    app.run(host='0.0.0.0', port=80)

到这里,我们可以发现,我们没有真正的在电脑上安装python,和requirements.txt里提到的flask或者redis。看起来,你并没有搭建好python+flask+redis的环境。但是,通过接下来的步骤,你即将拥有。

第四步:创建应用

检查工作文件夹下的三个文件是否都创建完成,三个文件如下:

$ ls
Dockerfile		app.py			requirements.txt

现在开始运行创建Docker镜像命令,我们加上-t命令来命名,这里我们起一个很友好的名字friendlyhello(^_^)

docker build -t friendlyhello .

我们可以看一看执行的命令的回显:

Sending build context to Docker daemon  4.608kB
Step 1/7 : FROM python:2.7-slim
2.7-slim: Pulling from library/python
802b00ed6f79: Pull complete
10b2d5f7ed73: Pull complete
1073a127cf89: Pull complete
90283f3dc1cd: Pull complete
Digest: sha256:0a43a6d7858af4a42427c792b682936d2cd34e183fb026627f53ddb556d4bf62
Status: Downloaded newer image for python:2.7-slim
 ---> c9cde4658340
Step 2/7 : WORKDIR /app
 ---> Running in 5b6e0800c538
Removing intermediate container 5b6e0800c538
 ---> 3ac183b809ce
Step 3/7 : COPY . /app
 ---> b05ac52c77de
Step 4/7 : RUN pip install --trusted-host pypi.python.org -r requirements.txt
 ---> Running in 58bd2a10311e
Collecting Flask (from -r requirements.txt (line 1))
  Downloading https://files.pythonhosted.org/packages/7f/e7/08578774ed4536d3242b14dacb4696386634607af824ea997202cd0edb4b/Flask-1.0.2-py2.py3-none-any.whl (91kB)
Collecting Redis (from -r requirements.txt (line 2))
  Downloading https://files.pythonhosted.org/packages/3b/f6/7a76333cf0b9251ecf49efff635015171843d9b977e4ffcf59f9c4428052/redis-2.10.6-py2.py3-none-any.whl (64kB)
Collecting itsdangerous>=0.24 (from Flask->-r requirements.txt (line 1))
  Downloading https://files.pythonhosted.org/packages/dc/b4/a60bcdba945c00f6d608d8975131ab3f25b22f2bcfe1dab221165194b2d4/itsdangerous-0.24.tar.gz (46kB)
Collecting Jinja2>=2.10 (from Flask->-r requirements.txt (line 1))
  Downloading https://files.pythonhosted.org/packages/7f/ff/ae64bacdfc95f27a016a7bed8e8686763ba4d277a78ca76f32659220a731/Jinja2-2.10-py2.py3-none-any.whl (126kB)
Collecting Werkzeug>=0.14 (from Flask->-r requirements.txt (line 1))
  Downloading https://files.pythonhosted.org/packages/20/c4/12e3e56473e52375aa29c4764e70d1b8f3efa6682bef8d0aae04fe335243/Werkzeug-0.14.1-py2.py3-none-any.whl (322kB)
Collecting click>=5.1 (from Flask->-r requirements.txt (line 1))
  Downloading https://files.pythonhosted.org/packages/fa/37/45185cb5abbc30d7257104c434fe0b07e5a195a6847506c074527aa599ec/Click-7.0-py2.py3-none-any.whl (81kB)
Collecting MarkupSafe>=0.23 (from Jinja2>=2.10->Flask->-r requirements.txt (line 1))
  Downloading https://files.pythonhosted.org/packages/4d/de/32d741db316d8fdb7680822dd37001ef7a448255de9699ab4bfcbdf4172b/MarkupSafe-1.0.tar.gz
Building wheels for collected packages: itsdangerous, MarkupSafe
  Running setup.py bdist_wheel for itsdangerous: started
  Running setup.py bdist_wheel for itsdangerous: finished with status 'done'
  Stored in directory: /root/.cache/pip/wheels/2c/4a/61/5599631c1554768c6290b08c02c72d7317910374ca602ff1e5
  Running setup.py bdist_wheel for MarkupSafe: started
  Running setup.py bdist_wheel for MarkupSafe: finished with status 'done'
  Stored in directory: /root/.cache/pip/wheels/33/56/20/ebe49a5c612fffe1c5a632146b16596f9e64676768661e4e46
Successfully built itsdangerous MarkupSafe
Installing collected packages: itsdangerous, MarkupSafe, Jinja2, Werkzeug, click, Flask, Redis
Successfully installed Flask-1.0.2 Jinja2-2.10 MarkupSafe-1.0 Redis-2.10.6 Werkzeug-0.14.1 click-7.0 itsdangerous-0.24
Removing intermediate container 58bd2a10311e
 ---> 20b7d92b6075
Step 5/7 : EXPOSE 80
 ---> Running in 45f7bfcee8c8
Removing intermediate container 45f7bfcee8c8
 ---> 0c99f24bb0ca
Step 6/7 : ENV NAME World
 ---> Running in 4d192a73ee76
Removing intermediate container 4d192a73ee76
 ---> da526dcf3514
Step 7/7 : CMD ["python", "app.py"]
 ---> Running in 50226d88c2d5
Removing intermediate container 50226d88c2d5
 ---> bb0d475e1b3c
Successfully built bb0d475e1b3c
Successfully tagged friendlyhello:latest

分析回显,我们可以看到执行的过程有7步:

Step 1/7 : FROM python:2.7-slim
Step 2/7 : WORKDIR /app
Step 3/7 : COPY . /app
Step 4/7 : RUN pip install --trusted-host pypi.python.org -r requirements.txt
Step 5/7 : EXPOSE 80
Step 6/7 : ENV NAME World
Step 7/7 : CMD ["python", "app.py"]

这7步,是在Dockerfile里指定的(所以Dockerfile最关键啊#_#)。
命令执行完后,我们可以输入如下命令来查看本机安装的docker 镜像

$ docker image ls
REPOSITORY            TAG                 IMAGE ID
friendlyhello         latest              326387cea398第五步

第五步:运行应用

运行应用,并且把你物理机(或者云服务器)的4000端口映射到我们容器的80端口,使用-p命令:

docker run -p 4000:80 friendlyhello

哈?你问为什么要这样做?因为你的app.py文件里指的是80端口,如果我们没有使用docker,直接是在自己电脑上运行该python程序,确实可以通过http://0.0.0.0:80进行访问。目前在我们的容器中,确实也是80端口启用了,但是要让我们的其他用户访问这台物理机地址的容器内的python应用,需要把物理机的端口4000与容器的80端口进行映射。现在,请用http://localhost:4000 来检查一下吧

如果你是布置在别的机器上而非本机的话,也可以用地址加端口号的方式来访问。例如http://192.168.99.100:4000/ 或者http://www.yinyubo.cn:4000/
没有浏览器的话,也可以通过curl命令工具来访问

$ curl http://localhost:4000
<h3>Hello World!</h3><b>Hostname:</b> 8fc990912a14<br/><b>Visits:</b> <i>cannot connect to Redis, counter disabled</i>

如果你需要关闭docker应用的话,可以用如下方法:

$ docker container ls
CONTAINER ID        IMAGE               COMMAND             CREATED
1fa4ab2cf395        friendlyhello       "python app.py"     28 seconds ago

先获得docker 容器的ID,然后用docker container stop 命令来关闭它,例如:

docker container stop 1fa4ab2cf395

wxpython加pyinstaller加pyecharts(解决python打包exe不兼容问题)

简单介绍:wxpython和pyecharts可以搭配使用,在桌面程序中展示web形式的图表。但是在使用pyinstaller打包成exe文件后,可能会出现如下BUG:

BUG1:在用pyinstaller将wxpython程序打包成exe文件后,运行会发生TemplateNotFound: simple_chart.html的报错信息。

这时候,需要把pyechats 的在python环境里的html文件拷贝出来,目录用/pyecharts/templates/ 然后放置在pyinstall打包后的主程序文件夹目录下

BUG2.生成了HTML文件之后,没有加载JS

1.去echarts官网下载echarts.common.min.js放在resource目录下
2.修改Libsite-packagespyechartstemplates的simple_page.html和simple_chart.html 的{{ echarts_js_dependencies(chart) }} 变成<script type=”text/javascript” src=”../echarts.common.min.js”></script>,然后重新打包
(补充解释:把echarts.common.min.js 放在pyecharts生成的HTML文件的上级目录里,对应src=”../echarts.common.min.js”)
4.修改wxpython的代码,在frame里增加一个webview

self.frame = reportFrame.MyFrame(None, wx.ID_ANY, "")
self.wv = webview.WebView.New(self.frame.panel_1, size=(500, 600)) # 加了这行就能整体拖动了
name = os.path.abspath(os.getcwd() + './resource/reports/init_report.html')
self.wv.LoadURL("file:///"+name)

5.把pyecharts/template目录和resource目录一起拷贝到manage目录下(manage是因为我打包的时候用的命令是pyinstaller -D manage.py)
因为有读者不是很明白文件结构,下面附上我的resource目录和pyechart生成的结构html文件目录
resource目录


生成的html文件里的内容

jinja2不兼容pyinstaller打包exe程序的解决办法

jinja2是python下的一个根据html模板,产生html文件的库。在jinja2官方文档中,推荐使用PackageLoader的方式,产生html文件,但是这个方式却与pyinstaller冲突,所以我们需要修改成FileSystemLoader的方式来解决打包文件的问题。

不兼容pyinstall的老代码(PackageLoader产生HTML文件)
#使用PackageLoader产生html文件
def create_defect_html(defectlist, fileds, reportname=None):
    """
    create html defects report in "./reports" directory
    :param defectlist:传入问题单列表
    :param fileds:传入问题单关键字列表
    :param reportname:传入报告文件名称,若有需要可以指定生成的html报告名称;若不传,则默认为DefectList.html
    :return:无返回,在reports目录下生成html报告
    """
    mycolumnlist = col_transform(fileds)
    env = Environment(loader = PackageLoader('TAReport', 'templates'))
    template = env.get_template('DefectTemplate.html')
    if reportname:
        filestr = './reports/' + reportname + '.html'
    else:
        filestr = './reports/DefectList.html'
    with open(filestr, 'w+') as f:
        f.write(str(template.render(defectlist=defectlist, columnlist=mycolumnlist)))
使用FileSystemLoader,能够正确使用pyinstaller打包的新代码
from jinja2 import Environment, PackageLoader, FileSystemLoader
def create_defect_html(defectlist, fileds, reportname=None):
    """
    create html defects report in "./reports" directory
    :param defectlist:传入问题单列表
    :param fileds:传入问题单关键字列表
    :param reportname:传入报告文件名称,若有需要可以指定生成的html报告名称;若不传,则默认为DefectList.html
    :return:无返回,在reports目录下生成html报告
    """
    mycolumnlist = col_transform(fileds)
    template_file_name = "DefectTemplate.html"
    template_file_path = resource_path('resource/templates', template_file_name)
    template_file_directory = os.path.dirname(template_file_path)
    template_loader = FileSystemLoader(searchpath=template_file_directory)
    env = Environment(loader=template_loader)
    template = env.get_template(template_file_name)
    if reportname:
        filestr = os.path.abspath(os.getcwd() + "./resource/reports/" + reportname + '.html')
        # filestr = './resource/reports/' + reportname + '.html'
    else:
        filestr = os.path.abspath(os.getcwd() + "./resource/reports/DefectList.html")
        # filestr = './resource/reports/DefectList.html'
    html = template.render(defectlist=defectlist, columnlist=mycolumnlist)
    with open(filestr, 'w') as f:
            f.write(html)
def resource_path(relative_path, file_name):
    """ Get absolute path to resource, works for both in IDE and for PyInstaller """
    # PyInstaller creates a temp folder and stores path in sys._MEIPASS
    # In IDE, the path is os.path.join(base_path, relative_path, file_name)
    # Search in Dev path first, then MEIPASS
    base_path = os.path.abspath(".")
    dev_file_path = os.path.join(base_path, relative_path, file_name)
    if os.path.exists(dev_file_path):
        return dev_file_path
    else:
        base_path = sys._MEIPASS
        file_path = os.path.join(base_path, file_name)
        if not os.path.exists(file_path):
            msg = "nError finding resource in either {} or {}".format(dev_file_path, file_path)
            print(msg)
            return None
        return file_path

python-批量把文件和文件夹同时压缩成ZIP文件

  • 明确需求(压缩成ZIP文件,文件中既有普通文件,又有文件夹)

    1.通过某种方式获得一个文件(文件夹)列表作为一个list(例如wxpython的wx.FileDialog方法,在下面的代码中我们跳过文件夹列表的获取方法)。
    2.选择一个压缩文件的输出目录和压缩文件的输出名字(下面代码中选择输出默认路径为程序根目录)
    3.把文件list里的文件,先统一放在一个临时文件夹里,然后把该临时文件夹压缩成ZIP文件,最后删掉临时文件夹

  • 程序关键点

1.使用python的shutil模块。拷贝文件和拷贝文件夹用的是不同的方法,在填写目标文件夹时,有很大区别,copytree()如果目标文件夹路径已存在,会导致拷贝失败,所以copytree()的目标文件夹路径,我设计成了目标目录+原文件夹名称的路径

#拷贝文件,该方法第二个参数填写的是目标目录
shutil.copy2(srcfile, folder_name)
#拷贝文件夹,该方法的第二个参数,是目标目录+原文件夹名称,
#因为如果目标文件夹路径已存在会导致拷贝失败
last_name = os.path.basename(srcfile)
destination_name = folder_name + last_name
shutil.copytree(srcfile, destination_name)

2.打包文件夹和删除文件夹,使用shutil的make_archive()和rmtree()

shutil.make_archive(source, "zip", source)
shutil.rmtree(source)
  • 完整代码

运行测试时,请修改file的路径为你自己电脑里的文件路径

# -*- coding: UTF-8 -*-
import os
import shutil
def copy_and_zip(file_list, dst_folder_name):
    '''
    批量复制文件到指定文件夹,然后把指定文件夹的内容压缩成ZIP并且删掉该文件夹
    :param file_list: 文件或文件夹
    :param dst_folder_name: 目标压缩文件的名称
    :return:
    '''
    for item in file_list:
        copy_file(item, dst_folder_name)
    # 这里我把输出文件的路径选到了程序根目录下
    source = os.getcwd() + "\" + dst_folder_name
    shutil.make_archive(source, "zip", source)
    shutil.rmtree(source)
def copy_file(srcfile, filename):
    '''
    把文件或文件夹复制到指定目录中
    :param srcfile: 文件或者文件夹的绝对路径
    :param filename: 指定目录
    :return:
    '''
    dstfile = os.path.abspath(os.getcwd())
    # 这里我把输出文件的路径选到了程序根目录下
    folder_name = dstfile + "\" + filename + "\"
    if not os.path.isfile(srcfile):
        last_name = os.path.basename(srcfile)
        destination_name = folder_name + last_name
        shutil.copytree(srcfile, destination_name)
        print("copy %s -> %s" % (srcfile, destination_name))
    else:
        fpath, fname = os.path.split(folder_name)  # 分离文件名和路径
        if not os.path.exists(fpath):
            os.makedirs(fpath)  # 创建路径
        shutil.copy2(srcfile, folder_name)  # 移动文件
        print("copy %s -> %s" % (srcfile, folder_name))
if __name__ == '__main__':
    file1 = "C:/Users/Pictures/1/1.jpg"
    file2 = "C:/Users/Pictures/1/sitemap.xml"
    file3 = "C:/lzw_programming/resource/"
    file_list = [file1, file2, file3]
    # 目标压缩包名
    folder_name = "1234567"
    copy_and_zip(file_list, folder_name)

wxpython-通过request远程下载网络zip文件,并解压安装文件

  • 明确需求(升级程序)

1.通过wxpython,产生一个窗体,窗体上有一段[文字标签],一个[进度条],一个[开始按钮]。
2.点击【开始按钮】,下载网络资源文件http://example.cn/test.zip。进度条和文字标签同时显示百分比
3.下载完成后,解压到指定目录。如果指定目录下有文件,则覆盖掉。

  • 设计界面

  • 程序关键点

1.wxpython用的进度条控件是wx.guage.定义如下:

self.gauge_1 = wx.Gauge(self, wx.ID_ANY, 100, style=wx.GA_HORIZONTAL | wx.GA_SMOOTH)

设置进度条的方法如下:msg填的是数字

self.download_gauge.SetValue(msg)

2.因为下载时间长,所以需要在主线程外再启用一个线程下载,避免程序假死。
3.通过request.Session().get方法下载比request.get下载要快

requests.Session().get(url, verify=False, stream=True)

4.通过stream的形式可以获得下载进度。如下,message是下载进度,例如10%,message为10

for chunk in response.iter_content(chunk_size=512):
    if chunk:
        code.write(chunk)
        code.flush()
    i = i + 512
    number = int(i)
    message = number * 100 / total_length

5.Zipfile解压文件,如果解压目录下有同名文件,则会直接覆盖掉

azip = zipfile.ZipFile(zip_file_path)
azip.extractall(path=unzip_to_path)
  • 完整代码(frame窗体和event事件)

updateOTAFrame.py(窗体文件,用wxglade创建)

#!/usr/bin/env python
# -*- coding: UTF-8 -*-
#
# generated by wxGlade 0.9.0pre on Thu Sep 06 09:41:05 2018
#
import wx
# begin wxGlade: dependencies
# end wxGlade
# begin wxGlade: extracode
# end wxGlade
class MyFrame(wx.Frame):
    def __init__(self, *args, **kwds):
        # begin wxGlade: MyFrame.__init__
        kwds["style"] = kwds.get("style", 0) | wx.DEFAULT_FRAME_STYLE
        wx.Frame.__init__(self, *args, **kwds)
        self.SetSize((475, 137))
        self.label_1 = wx.StaticText(self, wx.ID_ANY, "start")
        self.gauge_1 = wx.Gauge(self, wx.ID_ANY, 100, style=wx.GA_HORIZONTAL | wx.GA_SMOOTH)
        self.button_1 = wx.Button(self, wx.ID_ANY, "start")
        self.__set_properties()
        self.__do_layout()
        # end wxGlade
    def __set_properties(self):
        # begin wxGlade: MyFrame.__set_properties
        self.SetTitle(u"u5347u7ea7u7a0bu5e8f")
        # end wxGlade
    def __do_layout(self):
        # begin wxGlade: MyFrame.__do_layout
        sizer_1 = wx.BoxSizer(wx.VERTICAL)
        sizer_2 = wx.BoxSizer(wx.VERTICAL)
        sizer_2.Add(self.label_1, 1, 0, 0)
        sizer_2.Add(self.gauge_1, 1, wx.EXPAND, 0)
        sizer_2.Add(self.button_1, 1, wx.ALIGN_CENTER, 0)
        sizer_1.Add(sizer_2, 1, wx.EXPAND, 0)
        self.SetSizer(sizer_1)
        self.Layout()
        # end wxGlade
# end of class MyFrame

updateOTAevent.py(事件文件,和窗体文件分开)

# -*- coding: UTF-8 -*-
import os
import zipfile
from threading import Thread
import requests
import wx
from wx.lib.pubsub import pub
from view.window import updateOTAFrame
class MyApp(wx.App):
    def OnInit(self):
        self.frame = updateOTAFrame.MyFrame(None, wx.ID_ANY, "")
        self.frame.CenterOnScreen()
        self.download_gauge = self.frame.gauge_1
        self.start_button = self.frame.button_1
        self.frame.timer = wx.Timer(self.frame)  # 创建定时器
        # 绑定一个定时器事件,wxpython存在bug,不设定定时器,pub功能不会正常启用
        self.frame.Bind(wx.EVT_TIMER, self.on_timer, self.frame.timer)
        self.frame.Show()
        self.start_button.Bind(wx.EVT_BUTTON, self.start_event)
        pub.subscribe(self.update_ota, "ota_topic")
        pub.subscribe(self.download_text_topic, "download_text_topic")
        self.download_text = self.frame.label_1
        self.download_text.SetLabelText("点击开始升级按钮,即刻开始升级")
        self.start_button.SetLabelText("开始升级")
        pub.subscribe(self.close_frame, "close_download_topic")
        return True
    # 下载完成后,关闭窗口
    def close_frame(self, msg):
        self.frame.Destroy()
    # 开始下载按钮事件
    def start_event(self, event):
        self.start_button.SetLabelText("正在升级")
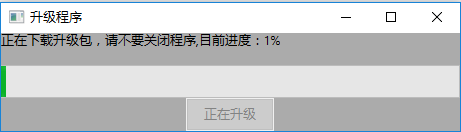
        self.download_text.SetLabelText("正在下载升级包,请不要关闭程序,目前进度:0%")
        self.start_button.Disable()
        GuageThread()
        event.Skip()
    # 控制下载的时候的文字
    def download_text_topic(self, msg):
        if msg < 100:
            self.download_text.SetLabelText("正在下载升级包,请不要关闭程序,目前进度:" + str(msg) + "%")
        else:
            self.download_text.SetLabelText('下载成功,现在开始解压,请耐心等待大于10秒')
            self.start_button.SetLabelText('正在解压')
    # 控制下载的进度条
    def update_ota(self, msg):
        if msg < 100:  # 如果是数字,说明线程正在执行,显示数字
            self.download_gauge.SetValue(msg)
        else:
            self.download_gauge.SetValue(msg)
    def on_timer(self, evt):  # 定时执行检查网络状态
        pass
# 另外启动一个线程来控制进度条,不然程序会假死
class GuageThread(Thread):
    def __init__(self):
        # 线程实例化时立即启动
        Thread.__init__(self)
        self.start()
    def run(self):
        # 线程执行的代码
        self.download_file()
    def download_file(self):
        # url = "http://example.cn/test.zip" 是网络上的zip压缩包文件
        url = "http://example.cn/test.zip"
        # 通过Session来下载,速度比直接requests.get快了大约百分之30
        response = requests.Session().get(url, verify=False, stream=True)
        total_length = int(response.headers.get("Content-Length"))
        with open(os.path.abspath(os.getcwd() + "/resource/download/new.zip"), "wb") as code:
            i = 0
            temp = 0
            # 用chunk_size的方法来下载,可以知道当前的下载进度。chunk_size影响每次写入的内存大小
            for chunk in response.iter_content(chunk_size=512):
                if chunk:
                    code.write(chunk)
                    code.flush()
                i = i + 512
                number = int(i)
                # 因为进度条的长度设置成了100,所以这里要乘以100
                message = number * 100 / total_length
                wx.CallAfter(pub.sendMessage, "ota_topic", msg=message)
                if temp != message:
                    temp = message
                    wx.CallAfter(pub.sendMessage, "download_text_topic", msg=message)
        filepath = os.path.abspath(os.getcwd() + "/resource/download/new.zip")
        # 直接放在程序根目录下了
        foldpath = os.path.abspath(os.getcwd())
        self.unzip(filepath, foldpath)
        wx.CallAfter(pub.sendMessage, "close_download_topic", msg=1)
    # 解压文件用的zipfile,将解压的文件,放置到指定路径下(覆盖复制)
    def unzip(self, zip_file_path, unzip_to_path):
        unzip_flag = False
        try:
            check_zip_flag = zipfile.is_zipfile(zip_file_path)
            if check_zip_flag:
                azip = zipfile.ZipFile(zip_file_path)
                azip.extractall(path=unzip_to_path)
                unzip_flag = True
        except Exception as e:
            print e.message
        finally:
            print "unzip_flag==========", unzip_flag
            return unzip_flag
# end of class MyApp
if __name__ == "__main__":
    app = MyApp(0)
    app.MainLoop()

注:  把 url = “http://example.cn/test.zip” 修改为自己要下载的网络zip压缩包文件。然后在updateOTAevent.py中运行即可。zip文件会下载完成后解压至程序根目录


苏ICP备18047533号-2