总览
electron是目前最流行的桌面级开发框架。作为一个老测开,不能停下学习的脚本。下面我用一个electron制作了一个登陆的例子,用到的功能包含简单的ipc通信,页面跳转,引入jquery,bootstrap。下面开始我们的分解动作。
文件目录
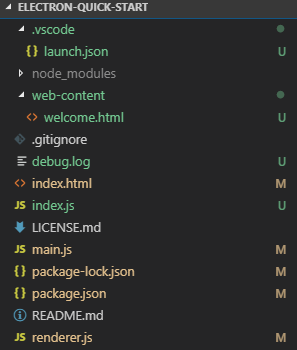
该工程是我下载了github上的quick-start的工程,自己修改了main.js和index.html。添加了一个web-content/welcome.html页面。
- main.js是后端主进程文件
- index.html是首页
- welcome.html是登录成功之后的页面
main.js(主进程)
main.js也就是主进程。这里我贴出用处最大的ipc前后端通信的代码。
讲解:后端用的是ipcMain。前端用的是ipcRender,这个开发模式是发布/订阅模式。ipc.on()发布一个‘login’的监听消息。当前端发起‘login’的请求时,触发后台的funtion()。mainWindow控制页面跳转。mainWindow.loadFile(‘./web-content/welcome.html’)用当前窗口打开一个welcome页面。
let mainWindow
const ipc = require('electron').ipcMain
ipc.on('login', function(event, user_name,user_password) {
  result='登录失败';
  console.log(user_name,user_password);  // 打印 "用户名密码"
  if(user_name=="1" && user_password=="2"){
     result='登录成功';
     console.log(result);
     //登录成功之后打开welcome页面
     mainWindow.loadFile('./web-content/welcome.html')
  }else{
    console.log(result);
  }
  //因为是同步策略,所以用event.returnValue
  event.returnValue = result;
  console.log("end");
});
index.html(首页)
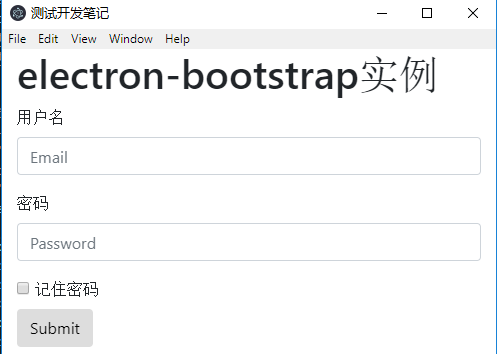
首页效果如上图,用户名输入1,密码输入2,点击submit按钮开始登陆。
为了引用bootstrap,我们在最前面的<head>下加入bootstrap和jquery
<head>
    <title>测试开发笔记</title>
    <meta charset="utf-8">
    <link rel="stylesheet" type="text/css" href="node_modules/bootstrap/dist/css/bootstrap.min.css">
    <script>if (typeof module === 'object') {window.module = module; module = undefined;}</script>
    <script>if (window.module) module = window.module;</script>
    <script src="https://cdn.bootcss.com/jquery/1.12.4/jquery.min.js"></script>
    <script src="https://cdn.bootcss.com/bootstrap/4.1.3/js/bootstrap.min.js"></script>
</head>
ipcRenderer连接后端,通过sendSync来同步发送消息,发送用户名和密码到后端,如果为真,新窗口打开github首页。用了jquery的$定位元素。用了.val()获得元素里填写的值,.afrer()在指定位置后添加元素。
<script>
  function connectMain() {
    const ipcRenderer = require('electron').ipcRenderer;
    var user_name=$("#input_username").val()
    var user_password=$("#input_userpassword").val()
    result=ipcRenderer.sendSync('login',user_name,user_password)
    if(result=="登录成功"){
      const remote = require('electron').remote;
      const BrowserWindow = remote.BrowserWindow;
      var win = new BrowserWindow({ width: 800, height: 600 });
      win.loadURL('https://github.com');
      // BrowserWindow.loadURL('https://github.com');
    }
    else{
      console.log($("#input_username"))
      var txt1="<div>密码错误</div>";
      $("#input_userpassword").after(txt1)
    }
    console.log(result)
  }
</script>
完整代码
main.js
// Modules to control application life and create native browser window
const {app, BrowserWindow,Menu,shell} = require('electron')
// Keep a global reference of the window object, if you don't, the window will
// be closed automatically when the JavaScript object is garbage collected.
let mainWindow
const ipc = require('electron').ipcMain
ipc.on('login', function(event, user_name,user_password) {
  result='登录失败';
  console.log(user_name,user_password);  // 打印 "用户名密码"
  if(user_name=="1" && user_password=="2"){
     result='登录成功';
     console.log(result);
     //登录成功之后打开welcome页面
     mainWindow.loadFile('./web-content/welcome.html')
  }else{
    console.log(result);
  }
  //因为是同步策略,所以用event.returnValue
  event.returnValue = result;
  console.log("end");
});
function createWindow () {
  // Create the browser window.
  mainWindow = new BrowserWindow({width: 800, height: 600})
  // and load the index.html of the app.
  mainWindow.loadFile('index.html')
  // Open the DevTools.
  // mainWindow.webContents.openDevTools()
  // Emitted when the window is closed.
  mainWindow.on('closed', function () {
    // Dereference the window object, usually you would store windows
    // in an array if your app supports multi windows, this is the time
    // when you should delete the corresponding element.
    mainWindow = null
  })
}
// This method will be called when Electron has finished
// initialization and is ready to create browser windows.
// Some APIs can only be used after this event occurs.
app.on('ready', () => {
  createWindow()
})
// Quit when all windows are closed.
app.on('window-all-closed', function () {
  // On OS X it is common for applications and their menu bar
  // to stay active until the user quits explicitly with Cmd + Q
  if (process.platform !== 'darwin') {
    app.quit()
  }
})
app.on('activate', function () {
  // On OS X it's common to re-create a window in the app when the
  // dock icon is clicked and there are no other windows open.
  if (mainWindow === null) {
    createWindow()
  }
})
// In this file you can include the rest of your app's specific main process
// code. You can also put them in separate files and require them here.
index.html
<!DOCTYPE html>
<html>
<head>
    <title>测试开发笔记</title>
    <meta charset="utf-8">
    <link rel="stylesheet" type="text/css" href="node_modules/bootstrap/dist/css/bootstrap.min.css">
    <script>if (typeof module === 'object') {window.module = module; module = undefined;}</script>
    <script>if (window.module) module = window.module;</script>
    <script src="https://cdn.bootcss.com/jquery/1.12.4/jquery.min.js"></script>
    <script src="https://cdn.bootcss.com/bootstrap/4.1.3/js/bootstrap.min.js"></script>
</head>
<body>
  <div class="container-fluid">
    <h1 class="page-header">electron-bootstrap实例</h1>
    <div class="row">
      <div class="col-md-offset-8 col-sm-offset-3 col-md-4 col-sm-6">
        <div class="panel panel-default">
          <div class="panel-body">
            <form>
              <div class="form-group">
                <label for="input_username">用户名</label>
                <input type="email" class="form-control" id="input_username" placeholder="Email">
              </div>
              <div class="form-group">
                <label for="input_userpassword">密码</label>
                <input type="password" class="form-control" id="input_userpassword" placeholder="Password">
              </div>
              <div class="checkbox">
                <label>
                  <input type="checkbox"> 记住密码
                </label>
              </div>
              <button type="submit" id="abc" class="btn btn-default" onclick="connectMain()">开始登陆</button>
            </form>
          </div>
        </div>
      </div>
    </div>
  </div>
<script>
  function connectMain() {
    const ipcRenderer = require('electron').ipcRenderer;
    var user_name=$("#input_username").val()
    var user_password=$("#input_userpassword").val()
    result=ipcRenderer.sendSync('login',user_name,user_password)
    if(result=="登录成功"){
      const remote = require('electron').remote;
      const BrowserWindow = remote.BrowserWindow;
      var win = new BrowserWindow({ width: 800, height: 600 });
      win.loadURL('https://github.com');
      // BrowserWindow.loadURL('https://github.com');
    }
    else{
      console.log($("#input_username"))
      var txt1="<div>密码错误</div>";
      $("#input_userpassword").after(txt1)
    }
    console.log(result)
  }
</script>
</body>
    <script src="./renderer.js"></script>
</html>
welcome.html
<!DOCTYPE html>
<html>
<head>
    <title>es2105的写法</title>
    <meta charset="utf-8">
</head>
<body>
hello,world
</body>
</html>
renderer.js
function connectMain() {
    const ipcRenderer = require('electron').ipcRenderer;
    var user_name=$("#input_username").val()
    var user_password=$("#input_userpassword").val()
    result=ipcRenderer.sendSync('login',user_name,user_password)
    if(result=="登录成功"){
      const remote = require('electron').remote;
      const BrowserWindow = remote.BrowserWindow;
      var win = new BrowserWindow({ width: 800, height: 600 });
      win.loadURL('https://github.com');
      // BrowserWindow.loadURL('https://github.com');
    }
    else{
      console.log($("#input_username"))
      var txt1="<div>密码错误</div>";
      $("#input_userpassword").after(txt1)
    }
    console.log(result)
  }
package.json
{
  "name": "electron-quick-start",
  "version": "1.0.0",
  "description": "A minimal Electron application",
  "main": "main.js",
  "scripts": {
    "start": "electron ."
  },
  "repository": "https://github.com/electron/electron-quick-start",
  "keywords": [
    "Electron",
    "quick",
    "start",
    "tutorial",
    "demo"
  ],
  "author": "GitHub",
  "license": "CC0-1.0",
  "devDependencies": {
    "electron": "^2.0.0"
  },
  "dependencies": {
    "bootstrap": "^4.1.3",
    "electron-json-storage": "^4.1.4",
    "jquery": "^1.12.4",
    "popper.js": "^1.14.4"
  }
}
参考
https://wizardforcel.gitbooks.io/electron-doc/content/api/ipc-main.html
https://electronjs.org/docs/tutorial/first-app