月度归档: 2022年3月

使用loki+promtail+grafana架构分析nginx日志

0.前提

1.已经阅读过这篇文章https://www.yinyubo.com/2022/03/14/nginx%E5%8A%A8%E6%80%81%E5%A2%9E%E5%8A%A0%E6%A8%A1%E5%9D%97ngx_http_geoip2_module

并且在nginx里已经安装好了geoip2

2.电脑上安装好了docker和docker-compose

1.调整nginx的访问日志格式

编辑/etc/nginx/nginx.conf,内容参考如下

...
load_module modules/ngx_http_geoip2_module.so;
...
http {
    include       /etc/nginx/mime.types;
    geoip2 /home/lzw/GeoLite2-Country_20220222/GeoLite2-Country.mmdb {
        auto_reload 5m;
        $geoip2_metadata_country_build metadata build_epoch;
        $geoip2_data_country_code default=CN source=$remote_addr country iso_code;
        $geoip2_data_country_name country names en;
    }
    geoip2 /home/lzw/GeoLite2-City_20220222/GeoLite2-City.mmdb {
        $geoip2_data_city_name default=Nanjing city names en;
 
    }
    vhost_traffic_status_zone;
    vhost_traffic_status_filter_by_set_key $geoip2_data_country_code country::*;
    log_format json_analytics escape=json '{'
                            '"msec": "$msec", ' # request unixtime in seconds with a milliseconds resolution
                            '"connection": "$connection", ' # connection serial number
                            '"connection_requests": "$connection_requests", ' # number of requests made in connection
                    '"pid": "$pid", ' # process pid
                    '"request_id": "$request_id", ' # the unique request id
                    '"request_length": "$request_length", ' # request length (including headers and body)
                    '"remote_addr": "$remote_addr", ' # client IP
                    '"remote_user": "$remote_user", ' # client HTTP username
                    '"remote_port": "$remote_port", ' # client port
                    '"time_local": "$time_local", '
                    '"time_iso8601": "$time_iso8601", ' # local time in the ISO 8601 standard format
                    '"request": "$request", ' # full path no arguments if the request
                    '"request_uri": "$request_uri", ' # full path and arguments if the request
                    '"args": "$args", ' # args
                    '"status": "$status", ' # response status code
                    '"body_bytes_sent": "$body_bytes_sent", ' # the number of body bytes exclude headers sent to a client
                    '"bytes_sent": "$bytes_sent", ' # the number of bytes sent to a client
                    '"http_referer": "$http_referer", ' # HTTP referer
                    '"http_user_agent": "$http_user_agent", ' # user agent
                    '"http_x_forwarded_for": "$http_x_forwarded_for", ' # http_x_forwarded_for
                    '"http_host": "$http_host", ' # the request Host: header
                    '"server_name": "$server_name", ' # the name of the vhost serving the request
                    '"request_time": "$request_time", ' # request processing time in seconds with msec resolution
                    '"upstream": "$upstream_addr", ' # upstream backend server for proxied requests
                    '"upstream_connect_time": "$upstream_connect_time", ' # upstream handshake time incl. TLS
                    '"upstream_header_time": "$upstream_header_time", ' # time spent receiving upstream headers
                    '"upstream_response_time": "$upstream_response_time", ' # time spend receiving upstream body
                    '"upstream_response_length": "$upstream_response_length", ' # upstream response length
                    '"upstream_cache_status": "$upstream_cache_status", ' # cache HIT/MISS where applicable
                    '"ssl_protocol": "$ssl_protocol", ' # TLS protocol
                    '"ssl_cipher": "$ssl_cipher", ' # TLS cipher
                    '"scheme": "$scheme", ' # http or https
                    '"request_method": "$request_method", ' # request method
                    '"server_protocol": "$server_protocol", ' # request protocol, like HTTP/1.1 or HTTP/2.0
                    '"pipe": "$pipe", ' # "p" if request was pipelined, "." otherwise
                    '"gzip_ratio": "$gzip_ratio", '
                    '"http_cf_ray": "$http_cf_ray",'
                    '"geoip_country_code": "$geoip2_data_country_code"'
                    '}';
    access_log   /var/log/nginx/json_access.log json_analytics;

2.安装loki+promtail+grafana

1.编写docker-compose文件,内容如下

version: "3"
 
networks:
  loki:
 
services:
  loki:
    image: grafana/loki:2.4.1
    ports:
      - "3100:3100"
    volumes:
      - /home/lzw/loki/loki-conf:/etc/loki
    command: -config.file=/etc/loki/local-config.yaml
    networks:
      - loki
 
  promtail:
    image: grafana/promtail:2.4.1
    volumes:
      - /home/lzw/loki/promtail-conf:/etc/promtail
      - /var/log/nginx:/var/log/nginx
    command: -config.file=/etc/promtail/config.yml
    networks:
      - loki
 
  grafana:
    image: grafana/grafana:latest
    volumes:
      - /home/lzw/loki/grafana:/var/lib/grafana
    ports:
      - "3000:3000"
    networks:
      - loki

2,编写loki-conf/local-config.yaml 配置文件

auth_enabled: false
 
server:
  http_listen_port: 3100
 
common:
  path_prefix: /loki
  storage:
    filesystem:
      chunks_directory: /loki/chunks
      rules_directory: /loki/rules
  replication_factor: 1
  ring:
    instance_addr: 127.0.0.1
    kvstore:
      store: inmemory
 
schema_config:
  configs:
    - from: 2020-10-24
      store: boltdb-shipper
      object_store: filesystem
      schema: v11
      index:
        prefix: index_
        period: 24h
 
ruler:
  alertmanager_url: http://localhost:9093

3.编写promtail-conf/config.yml文件

server:
  http_listen_port: 9080
  grpc_listen_port: 0
 
positions:
  filename: /tmp/positions.yaml
 
clients:
  - url: http://loki:3100/loki/api/v1/push
 
scrape_configs:
- job_name: nginx
  static_configs:
  - targets:
      - localhost
    labels:
      job: nginx
      agent: promtail
      __path__: /var/log/nginx/json_access.log

4.准备grafana挂载目录

docker run -d -p 3002:3000 --name=grafana2 grafana/grafana:latest
docker cp grafana2:/var/lib/grafana /home/lzw/loki/.
docker rm -f grafana2
sudo chown -R 472 /home/lzw/loki/grafana

5.运行docker-compose

docker-compose -f docker-compose.yaml up -d

运行完成后,3000端口可以访问grafana、3100端口访问loki。nginx的日志文件通过volume的方式挂载进promtail

3.在grafana里配置报表

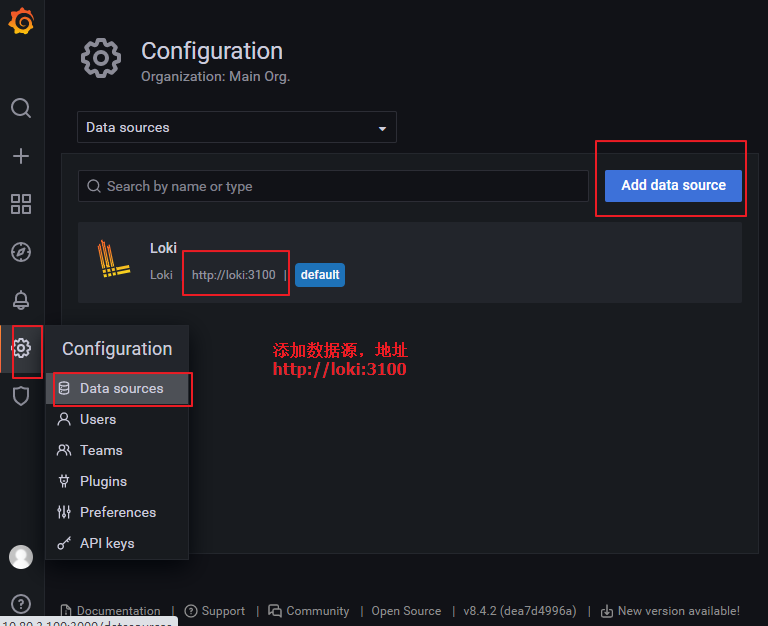
1.配置数据源http://loki:3100
2.导入官网模板https://grafana.com/grafana/dashboards/12559

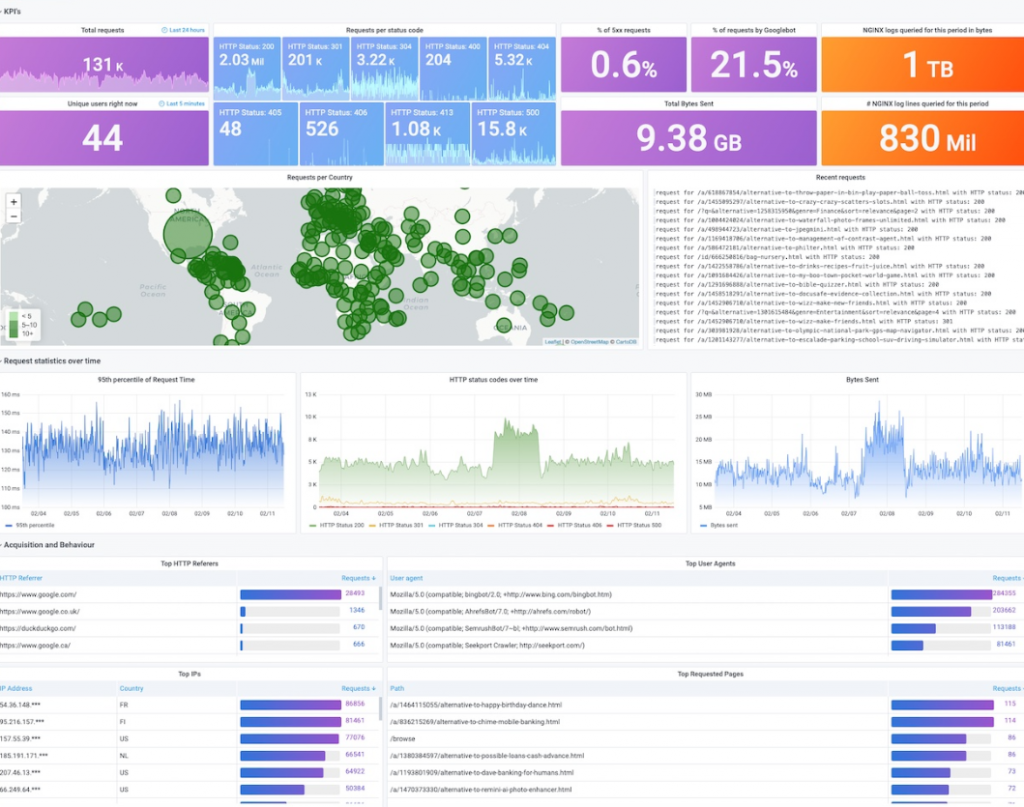
3.导入后的效果应该和下图类似
nginx动态增加模块ngx_http_geoip2_module

0.前提:

1.已经阅读过我的另一篇动态增加nginx-module-vts模块的文章,服务器里已经安装了nginx和其源码。https://www.yinyubo.com/2022/03/14/apt%e6%96%b9%e5%bc%8f%e5%ae%89%e8%a3%85nginx%e4%bb%a5%e5%8f%8a%e5%8a%a8%e6%80%81%e5%a2%9e%e5%8a%a0%e6%a8%a1%e5%9d%97nginx-module-vts/

2.已经去GeoLite2的官网下载了GeoLite2-Country.mmdb文件,这个网站需要注册才能下载

3.可以参考的github网站有

https://github.com/leev/ngx_http_geoip2_module

https://github.com/maxmind/libmaxminddb

1.安装libmaxminddb


sudo add-apt-repository ppa:maxmind/ppa
sudo apt update
sudo apt install libmaxminddb0 libmaxminddb-dev mmdb-bin

2.下载ngx_http_geoip2_module源码以及动态编译


# 下载ngx_http_geoip2_module源码
git clone https://github.com/leev/ngx_http_geoip2_module.git
#cd nginx源码目录,例如下面的命令
cd nginx-1.20.2/
# 进行动态编译
./configure --with-compat --prefix=/etc/nginx --sbin-path=/usr/sbin/nginx --add-dynamic-module=../ngx_http_geoip2_module --with-stream
make modules
cp objs/ngx_http_geoip2_module.so /etc/nginx/modules/.

3.在nginx配置文件里引入geoip2

这里我以在nginx-module-vts里加入geoip2地区解析为例,修改nginx.conf

...
load_module modules/ngx_http_vhost_traffic_status_module.so;
load_module modules/ngx_http_geoip2_module.so;
...
http {
    ...
    geoip2 /home/lzw/GeoLite2-Country_20220222/GeoLite2-Country.mmdb {
        auto_reload 5m;
        $geoip2_metadata_country_build metadata build_epoch;
        $geoip2_data_country_code default=CN source=$remote_addr country iso_code;
        $geoip2_data_country_name country names es;
    }
    geoip2 /home/lzw/GeoLite2-City_20220222/GeoLite2-City.mmdb {
        $geoip2_data_city_name default=Nanjing city names en;
        $geoip2_data_latitude location latitude;
        $geoip2_data_longitude location longitude;
        $geoip2_data_postalcode postal code;
    }
    default_type  application/octet-stream;
    vhost_traffic_status_zone;
    vhost_traffic_status_filter_by_set_key $geoip2_data_country_code country::*;
    vhost_traffic_status_filter_by_set_key $geoip2_data_city_name city::*;
    vhost_traffic_status_filter_by_set_key "$geoip2_data_latitude,$geoip2_data_longitude" latlong::*;
    vhost_traffic_status_filter_by_set_key $geoip2_data_longitude longitude::*;
    vhost_traffic_status_filter_by_set_key $geoip2_data_latitude latitude::*;
    vhost_traffic_status_filter_by_set_key $geoip2_data_postalcode postal::*;
    log_format  main  '$remote_addr - $remote_user [$time_local] "$request" '
                      '$status $body_bytes_sent "$http_referer" '
                      '"$http_user_agent" "$http_x_forwarded_for"';
 
    access_log  /var/log/nginx/access.log  main;
    ...
}

在每一个被监控的conf文件里 添加vhost_traffic_status_filter_by_set_key 信息,例如下面我添加了6个筛选项


server {
    listen       5320;
    server_name  localhost;    
    vhost_traffic_status_filter_by_set_key $geoip2_data_country_code country::$server_name;
    vhost_traffic_status_filter_by_set_key $geoip2_data_city_name city::$server_name;
    vhost_traffic_status_filter_by_set_key "$geoip2_data_latitude,$geoip2_data_longitude" latlong::$server_name;
    vhost_traffic_status_filter_by_set_key $geoip2_data_longitude longitude::$server_name;
    vhost_traffic_status_filter_by_set_key $geoip2_data_latitude latitude::$server_name;
    vhost_traffic_status_filter_by_set_key $geoip2_data_postalcode postal::$server_name;  
 
    location /status {
        vhost_traffic_status_display;
        vhost_traffic_status_display_format html;
        root   /usr/share/nginx/html;
        index  index.html index.htm;
    }
}

apt方式安装nginx以及动态增加模块nginx-module-vts

0.背景介绍

因为有很多人是先通过apt的访问安装了稳定版的nginx。后面突然要增加第三方模块如geoip或者nginx-module-vts等别的模块,这个时候就可以采用本文的方式去动态增加模块。

1.安装ubuntu(如果已经安装了,可以跳过)

# 安装必要工具
sudo apt install curl gnupg2 ca-certificates lsb-release ubuntu-keyring

# 导入官方Nginx签名密钥
curl https://nginx.org/keys/nginx_signing.key | gpg --dearmor \
    | sudo tee /usr/share/keyrings/nginx-archive-keyring.gpg >/dev/null

# 验证下载的文件中包含正确的密钥
gpg --dry-run --quiet --import --import-options import-show /usr/share/keyrings/nginx-archive-keyring.gpg

# 设置稳定版本的nginx仓库
echo "deb [signed-by=/usr/share/keyrings/nginx-archive-keyring.gpg] \
http://nginx.org/packages/ubuntu `lsb_release -cs` nginx" \
    | sudo tee /etc/apt/sources.list.d/nginx.list

# 通过apt安装nginx
sudo apt update
sudo apt install nginx

2.确认安装的nginx版本信息

输入 nginx -V 检查回显


nginx version: nginx/1.20.2
built by gcc 9.3.0 (Ubuntu 9.3.0-10ubuntu2)
built with OpenSSL 1.1.1f  31 Mar 2020
TLS SNI support enabled
configure arguments: --prefix=/etc/nginx --sbin-path=/usr/sbin/nginx --modules-path=/usr/lib/nginx/modules --conf-path=/etc/nginx/nginx.conf --error-log-path=/var/log/nginx/error.log --http-log-path=/var/log/nginx/access.log --pid-path=/var/run/nginx.pid --lock-path=/var/run/nginx.lock --http-client-body-temp-path=/var/cache/nginx/client_temp --http-proxy-temp-path=/var/cache/nginx/proxy_temp --http-fastcgi-temp-path=/var/cache/nginx/fastcgi_temp --http-uwsgi-temp-path=/var/cache/nginx/uwsgi_temp --http-scgi-temp-path=/var/cache/nginx/scgi_temp --user=nginx --group=nginx --with-compat --with-file-aio --with-threads --with-http_addition_module --with-http_auth_request_module --with-http_dav_module --with-http_flv_module --with-http_gunzip_module --with-http_gzip_static_module --with-http_mp4_module --with-http_random_index_module --with-http_realip_module --with-http_secure_link_module --with-http_slice_module --with-http_ssl_module --with-http_stub_status_module --with-http_sub_module --with-http_v2_module --with-mail --with-mail_ssl_module --with-stream --with-stream_realip_module --with-stream_ssl_module --with-stream_ssl_preread_module --with-cc-opt='-g -O2 -fdebug-prefix-map=/data/builder/debuild/nginx-1.20.2/debian/debuild-base/nginx-1.20.2=. -fstack-protector-strong -Wformat -Werror=format-security -Wp,-D_FORTIFY_SOURCE=2 -fPIC' --with-ld-opt='-Wl,-Bsymbolic-functions -Wl,-z,relro -Wl,-z,now -Wl,--as-needed -pie'

通过上述回显,我们可以看到nginx的配置文件路径和程序路径如下。这个路径用在后面的动态编译里

--prefix=/etc/nginx --sbin-path=/usr/sbin/nginx

3.下载nginx源代码到本地

因为我们之前的nginx是apt安装的,本地没有源码,而动态编译模块需要源码,所以这里下载源码到本地

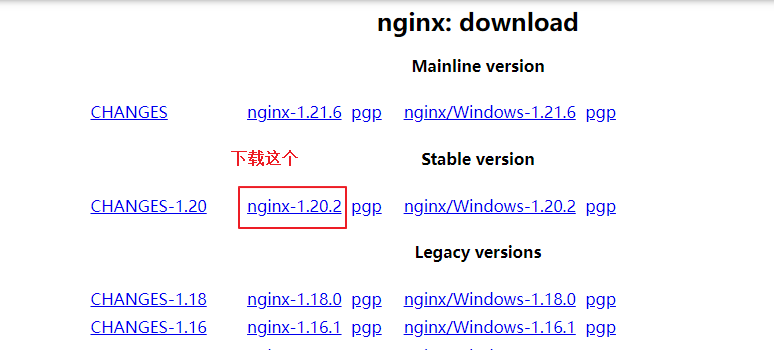
进入http://nginx.org/en/download.html,下载与我们上面apt安装的nginx同版本的tar.gz包,例如这里我们装的是1.20.2版本

解压nginx源代码
tar -zxvf nginx-1.20.2.tar.gz

4.下载第三方模块nginx-module-vts到本地

git clone git://github.com/vozlt/nginx-module-vts.git

下载完成后,两个目录同级,例如下面的目录

目录
|---nginx-1.20.2
|---nginx-module-vts

5.进行编译

安装编译所需要的lib库

sudo apt install g++ gcc libpcre3 libpcre3-dev zlib1g-dev openssl libssl-dev make

进入nginx-1.20.2目录

cd nginx-1.20.2

使用configure工具进行编译。编译完成后会在objs目录下生成文件ngx_http_vhost_traffic_status_module.so,把这个ngx_http_vhost_traffic_status_module.so拷贝到/etc/nginx/modules/目录下

./configure --with-compat --prefix=/etc/nginx --sbin-path=/usr/sbin/nginx --add-dynamic-module=../nginx-module-vts
make modules
sudo cp objs/ngx_http_vhost_traffic_status_module.so /etc/nginx/modules/.

6.在nginx里加载第三方模块nginx-module-vts

编辑nginx.conf文件.

在文件顶部添加load_module modules/ngx_http_vhost_traffic_status_module.so;

在http下添加vhost_traffic_status_zone;

cd /etc/nginx/
sudo nano nginx.conf
#  以下是文件内容
...
load_module modules/ngx_http_vhost_traffic_status_module.so;
...
http {
    vhost_traffic_status_zone;
}

在/etc/nginx/conf.d目录下增加一个monitor.conf。主要添加vhost_traffic_status_display;和vhost_traffic_status_display_format html; 参考如下

server {
    listen       5320;
    server_name  localhost;
 
    #access_log  /var/log/nginx/host.access.log  main;
 
    location /status {
        vhost_traffic_status_display;
        vhost_traffic_status_display_format html;
        root   /usr/share/nginx/html;
        index  index.html index.htm;
    }
}

添加完成后,输入sudo systemctl restart nginx重启nginx

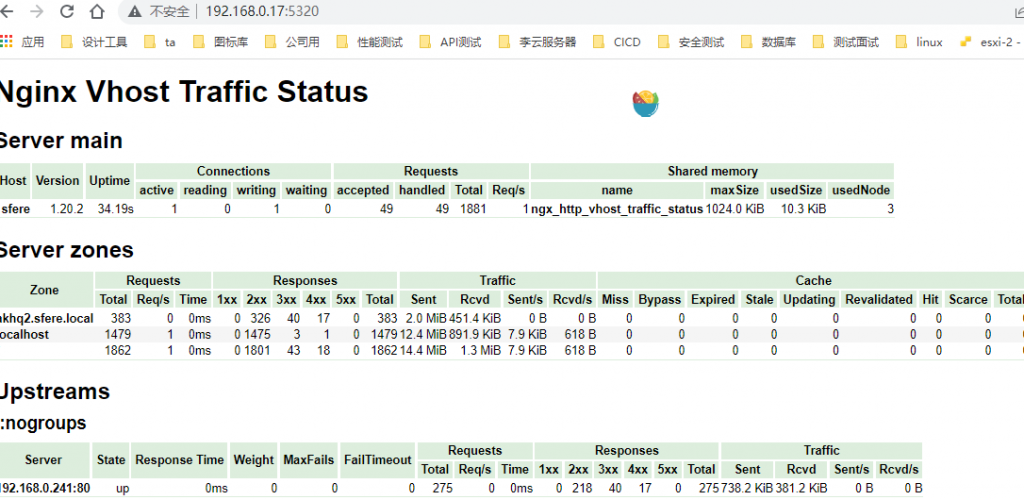
访问monitor.conf里对应的端口  http://服务器IP:5320/ 即可看到流量信息


苏ICP备18047533号-2