基于istio的灰度发布实验
背景
灰度发布又叫A/B测试,即让一部分用户继续用产品特性A,一部分用户开始用产品特性B,如果用户对B没有什么反对意见,那么逐步扩大范围,把所有用户都迁移到B上面来。
因为最近刚好有灰度发布的需求,我又学了一遍istio,记录了本次灰度发布的实施过程(只包括应用,不包括数据库升级)
实验过程
- 先确定目前的应用版本为V1
- 通过helm包部署应用版本为V2的pod到K8S集群中
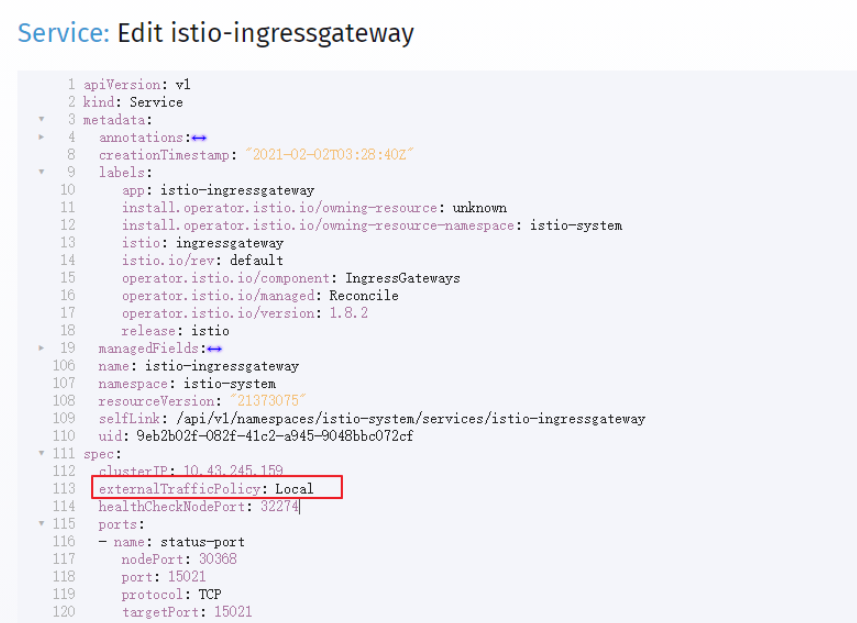
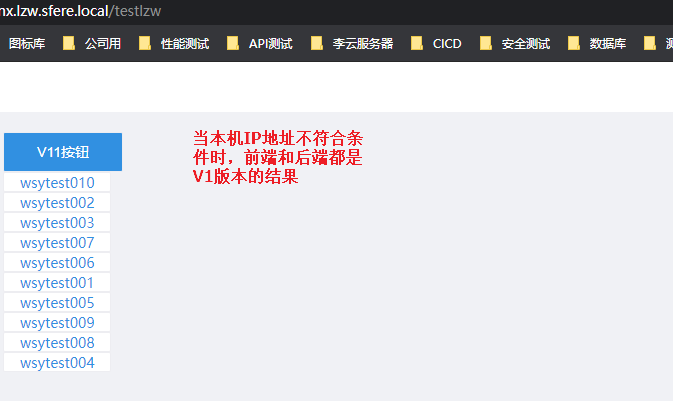
- 确定V2版本灰度的用户,方法包括IP,或者特定用户
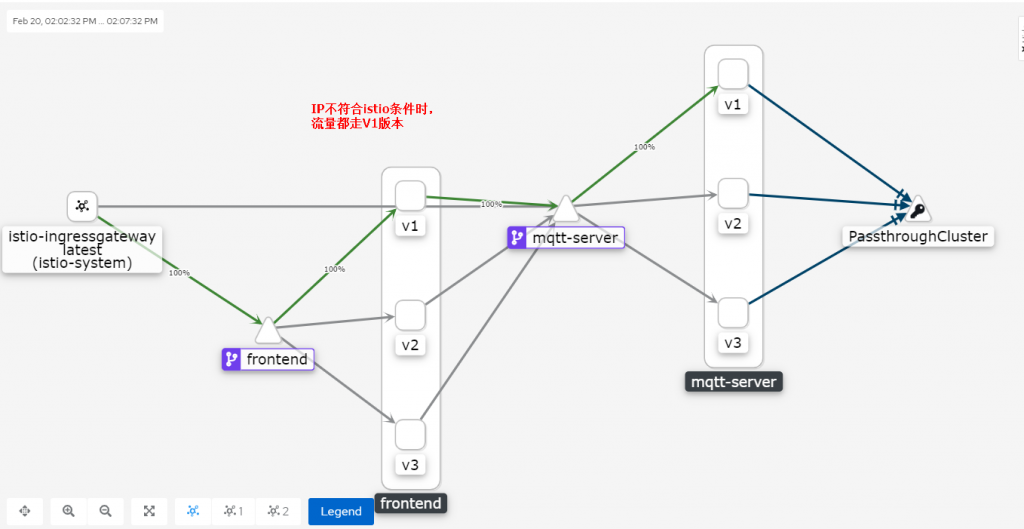
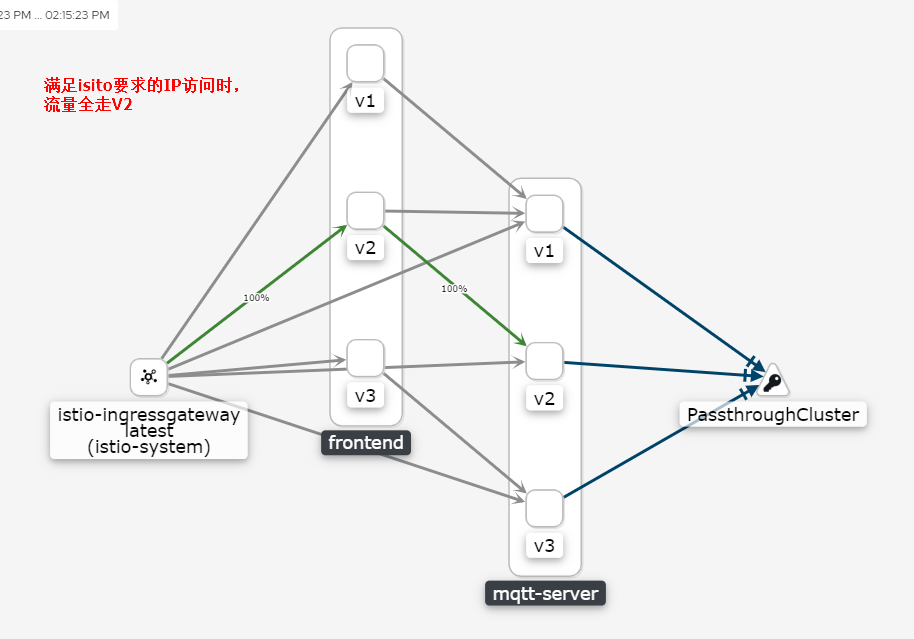
- 通过istio的virtualservice功能把特定用户的流量指向V2版本
- 检查特定用户使用一段时间后,是否出现问题
- 若无问题,通过istio将所有用户的流量都指向V2版本
- 若所有用户都使用V2无问题,删除掉V1版本的pod
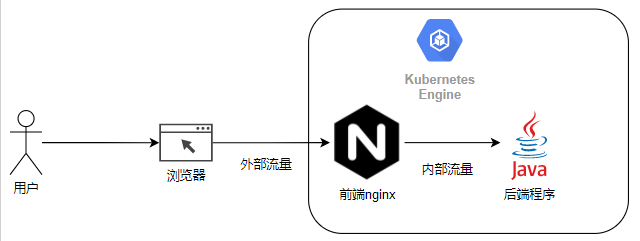
示例介绍
前端应用frontend,后端应用mqtt-server,后端应用mqtt-server 通过mqtt协议与设备相连接。
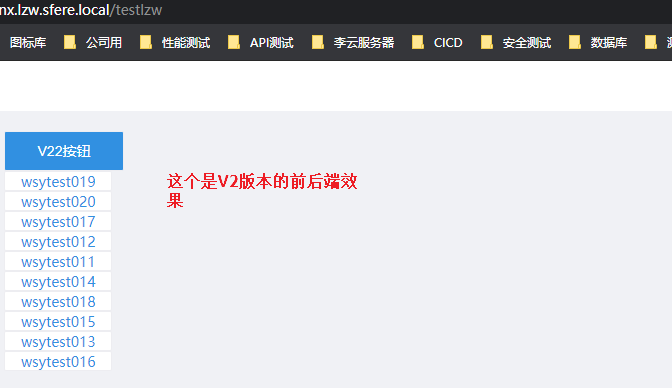
前端部署3个版本,分别是V1,V2,V3,后端同样部署3个版本,也是V1,V2,V3。3个前端版本,按钮文字不一样。3个后端版本,连接的mqtt设备不一样
| 版本 | 前端页面 | 后端返回参数 |
|---|---|---|
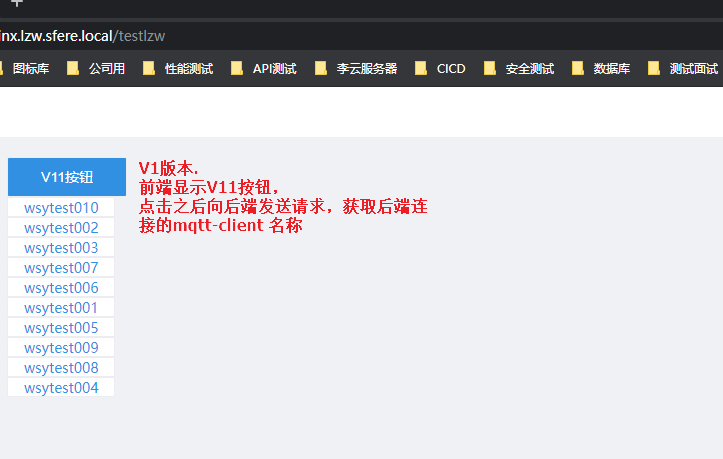
| V1 | 显示V11按钮 |
{"message":["wsytest010","wsytest002",
"wsytest003","wsytest007","wsytest006",
"wsytest001","wsytest005","wsytest009",
"wsytest008","wsytest004"]}
|
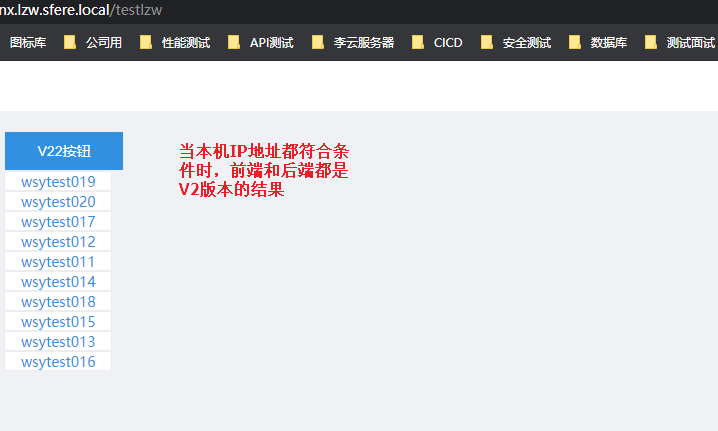
| V2 | 显示V22按钮 |
{"message":["wsytest019","wsytest020",
"wsytest017","wsytest012","wsytest011",
"wsytest014","wsytest018","wsytest015",
"wsytest013","wsytest016"]}
|
| V3 | 显示V33按钮 |
{"message":["wsytest024","wsytest028",
"wsytest022","wsytest026","wsytest027",
"wsytest021","wsytest025","wsytest030",
"wsytest023","wsytest029"]}
|
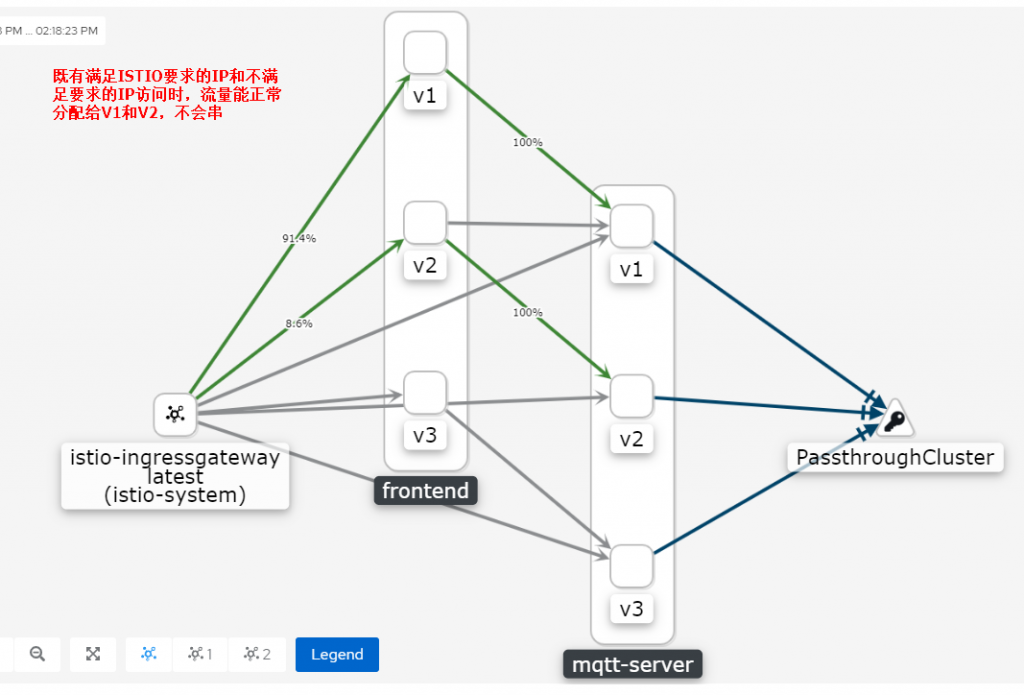
根据需求,版本不能串,比如前端V1->后端V1,不允许出现前端V1→后端V2这样的情况发生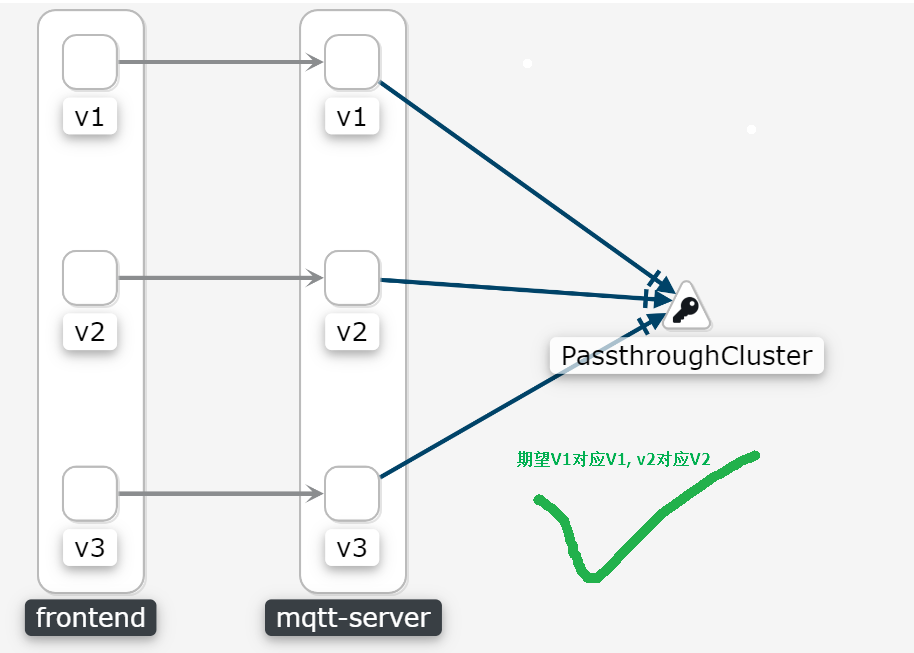
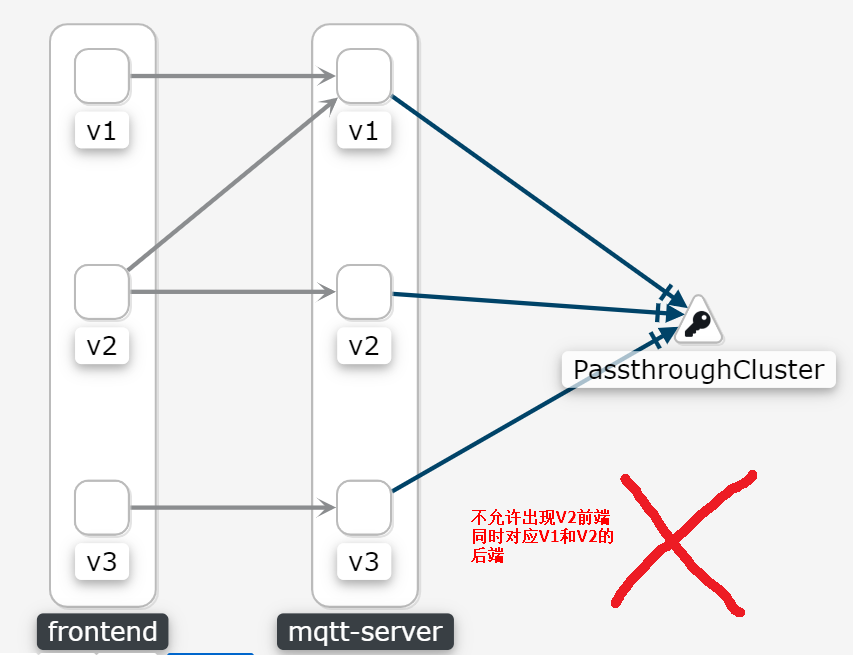
这里我们在选择分配流量方式时,不能使用权重的方式进行分配,只能选择指定用户或者指定IP,如果选择权重的方式,可能会出现如下的问题:
前端会访问多个js,css等文件,如果使用权重的方式,会出现一部分js来源于v1版本,一部分css来源于v2版本。
后端也同理,如果一个页面打开时,触发多个后端请求,部分来源于V2,部分来源于V1,肯定会导致前端显示出现问题。
所以只有把前后端通过某种方式一一对应,才能正常使用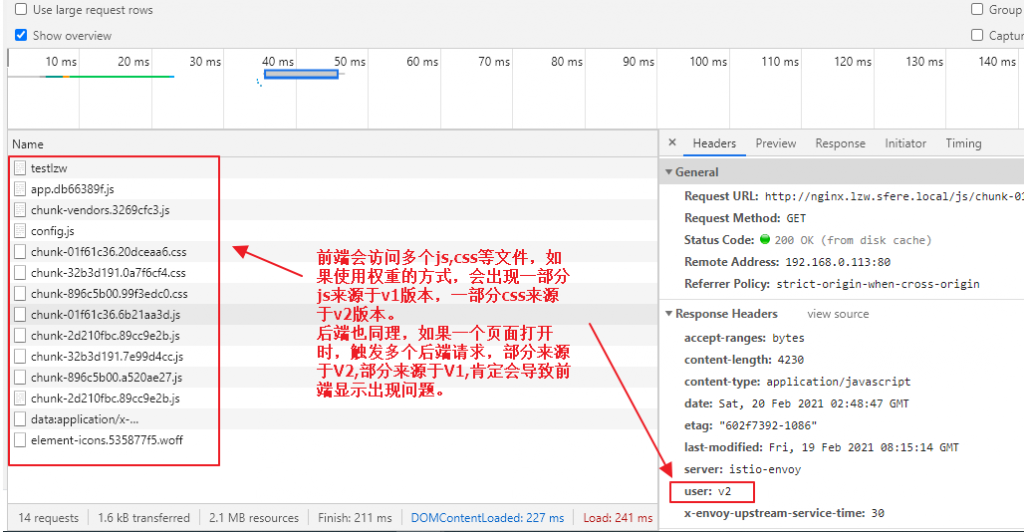
代码实现与注意事项
1.部署前端的3个应用程序,所有的pod都加上 labels:[app:frontend,version:#{对应版本}]
---
apiVersion: apps/v1
kind: Deployment
metadata:
  name: frontend
  labels:
    app: frontend
    version: v1
spec:
  replicas: 1
  selector:
    matchLabels:
      app: frontend
      version: v1
  template:
    metadata:
      labels:
        app: frontend
        version: v1
    spec:
      containers:
      - name: frontend
        image: 前端镜像:v1
        securityContext:
          capabilities:
            add: ["NET_ADMIN", "NET_RAW"]    # 按照istio的说明,最好把这个pod安全策略加上
        imagePullPolicy: Always
        ports:
        - containerPort: 80
---
apiVersion: apps/v1
kind: Deployment
metadata:
  name: frontend-v2
  labels:
    app: frontend
    version: v2
spec:
  replicas: 1
  selector:
    matchLabels:
      app: frontend
      version: v2
  template:
    metadata:
      labels:
        app: frontend
        version: v2
    spec:
      containers:
      - name: frontend
        image: 前端镜像:v2
        securityContext:
          capabilities:
            add: ["NET_ADMIN", "NET_RAW"]
        imagePullPolicy: Always
        ports:
        - containerPort: 80
---
apiVersion: apps/v1
kind: Deployment
metadata:
  name: frontend-v3
  labels:
    app: frontend
    version: v3
spec:
  replicas: 1
  selector:
    matchLabels:
      app: frontend
      version: v3
  template:
    metadata:
      labels:
        app: frontend
        version: v3
    spec:
      containers:
      - name: frontend
        image: 前端镜像:v3
        securityContext:
          capabilities:
            add: ["NET_ADMIN", "NET_RAW"]
        imagePullPolicy: Always
        ports:
        - containerPort: 80
---
apiVersion: v1
kind: Service
metadata:
  name: frontend
spec:
  selector:
    app: frontend
  type: ClusterIP   #这个不用NodePort,因为流量如果是从NodePort进来的,就控不住的
  ports:
    - port: 80
      targetPort: 80
      name: http-web
2.部署后端应用程序,与前端应用类似