elements = page.query_selector_all(".search-result__item")
number = 1
for item in elements:
    number = number + 1
    page.mouse.wheel(0, 100)
    item.screenshot(path="image/"+str(number) + ".png")
    time.sleep(1)
...
load_module modules/ngx_http_geoip2_module.so;
...
http {
include /etc/nginx/mime.types;
geoip2 /home/lzw/GeoLite2-Country_20220222/GeoLite2-Country.mmdb {
auto_reload 5m;
$geoip2_metadata_country_build metadata build_epoch;
$geoip2_data_country_code default=CN source=$remote_addr country iso_code;
$geoip2_data_country_name country names en;
}
geoip2 /home/lzw/GeoLite2-City_20220222/GeoLite2-City.mmdb {
$geoip2_data_city_name default=Nanjing city names en;
}
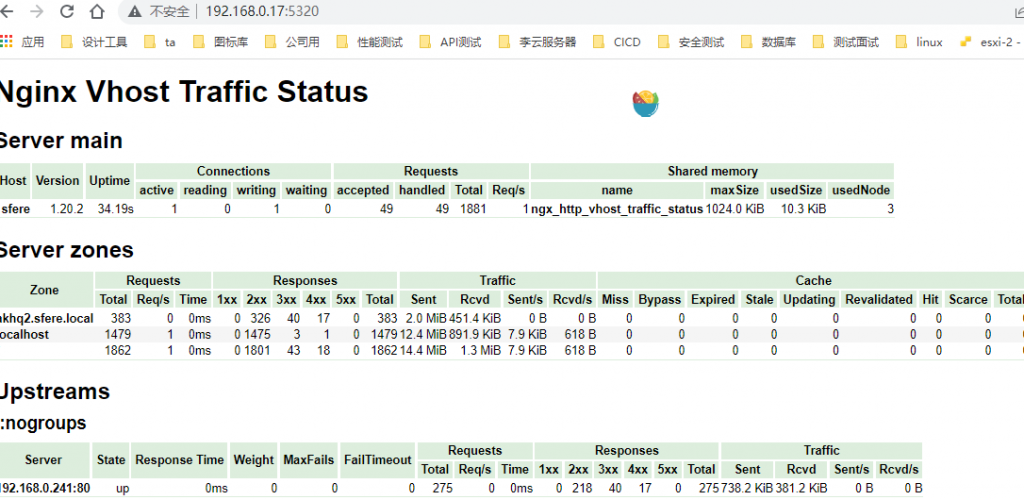
vhost_traffic_status_zone;
vhost_traffic_status_filter_by_set_key $geoip2_data_country_code country::*;
log_format json_analytics escape=json '{'
'"msec": "$msec", ' # request unixtime in seconds with a milliseconds resolution
'"connection": "$connection", ' # connection serial number
'"connection_requests": "$connection_requests", ' # number of requests made in connection
'"pid": "$pid", ' # process pid
'"request_id": "$request_id", ' # the unique request id
'"request_length": "$request_length", ' # request length (including headers and body)
'"remote_addr": "$remote_addr", ' # client IP
'"remote_user": "$remote_user", ' # client HTTP username
'"remote_port": "$remote_port", ' # client port
'"time_local": "$time_local", '
'"time_iso8601": "$time_iso8601", ' # local time in the ISO 8601 standard format
'"request": "$request", ' # full path no arguments if the request
'"request_uri": "$request_uri", ' # full path and arguments if the request
'"args": "$args", ' # args
'"status": "$status", ' # response status code
'"body_bytes_sent": "$body_bytes_sent", ' # the number of body bytes exclude headers sent to a client
'"bytes_sent": "$bytes_sent", ' # the number of bytes sent to a client
'"http_referer": "$http_referer", ' # HTTP referer
'"http_user_agent": "$http_user_agent", ' # user agent
'"http_x_forwarded_for": "$http_x_forwarded_for", ' # http_x_forwarded_for
'"http_host": "$http_host", ' # the request Host: header
'"server_name": "$server_name", ' # the name of the vhost serving the request
'"request_time": "$request_time", ' # request processing time in seconds with msec resolution
'"upstream": "$upstream_addr", ' # upstream backend server for proxied requests
'"upstream_connect_time": "$upstream_connect_time", ' # upstream handshake time incl. TLS
'"upstream_header_time": "$upstream_header_time", ' # time spent receiving upstream headers
'"upstream_response_time": "$upstream_response_time", ' # time spend receiving upstream body
'"upstream_response_length": "$upstream_response_length", ' # upstream response length
'"upstream_cache_status": "$upstream_cache_status", ' # cache HIT/MISS where applicable
'"ssl_protocol": "$ssl_protocol", ' # TLS protocol
'"ssl_cipher": "$ssl_cipher", ' # TLS cipher
'"scheme": "$scheme", ' # http or https
'"request_method": "$request_method", ' # request method
'"server_protocol": "$server_protocol", ' # request protocol, like HTTP/1.1 or HTTP/2.0
'"pipe": "$pipe", ' # "p" if request was pipelined, "." otherwise
'"gzip_ratio": "$gzip_ratio", '
'"http_cf_ray": "$http_cf_ray",'
'"geoip_country_code": "$geoip2_data_country_code"'
'}';
access_log /var/log/nginx/json_access.log json_analytics;
#cors.py
from typing import Iterable


def _add_cors_headers(response, methods: Iterable[str]) -> None:
    '''
    为了在测试的时候偷懒,我把Access-Control-Allow-Origin设置成了*
    如果是做成镜像和我的helm包一起用,是不需要这样的,因为我会用nginx把后端和前端设置成同源
    '''
    allow_methods = list(set(methods))
    if "OPTIONS" not in allow_methods:
        allow_methods.append("OPTIONS")
    headers = {
        "Access-Control-Allow-Methods": ",".join(allow_methods),
        "Access-Control-Allow-Origin": "*",
        "Access-Control-Allow-Credentials": "true",
        "Access-Control-Allow-Headers": (
            "origin, content-type, accept, "
            "authorization, x-xsrf-token, x-request-id"
        ),
    }
    response.headers.extend(headers)


def add_cors_headers(request, response):
    if request.method != "OPTIONS":
        methods = [method for method in request.route.methods]
        _add_cors_headers(response, methods)
options.py 搭配上面的cors.py使用
# options.py
from collections import defaultdict
from typing import Dict, FrozenSet

from sanic import Sanic, response
from sanic.router import Route

from cors import _add_cors_headers


def _compile_routes_needing_options(
        routes: Dict[str, Route]
) -> Dict[str, FrozenSet]:
    needs_options = defaultdict(list)
    # This is 21.12 and later. You will need to change this for older versions.
    for route in routes.values():
        if "OPTIONS" not in route.methods:
            needs_options[route.uri].extend(route.methods)

    return {
        uri: frozenset(methods) for uri, methods in dict(needs_options).items()
    }


def _options_wrapper(handler, methods):
    def wrapped_handler(request, *args, **kwargs):
        nonlocal methods
        return handler(request, methods)

    return wrapped_handler


async def options_handler(request, methods) -> response.HTTPResponse:
    resp = response.empty()
    _add_cors_headers(resp, methods)
    return resp


def setup_options(app: Sanic, _):
    app.router.reset()
    needs_options = _compile_routes_needing_options(app.router.routes_all)
    for uri, methods in needs_options.items():
        app.add_route(
            _options_wrapper(options_handler, methods),
            uri,
            methods=["OPTIONS"],
        )
    app.router.finalize()